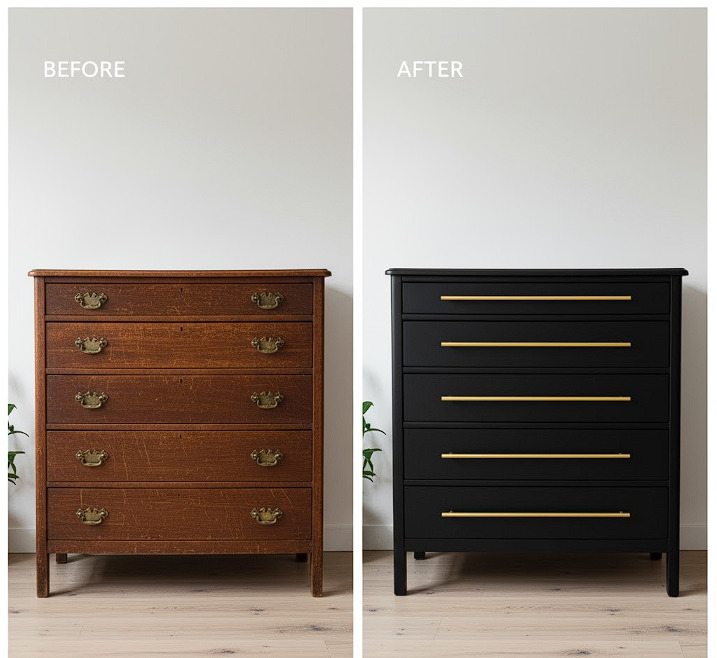
The pursuit of a Cozy Crafted home shouldn’t require a high budget. In fact, some of the most soulful, character-filled pieces are not found in big box stores, but waiting to be rescued from thrift shops, estate sales, or even the side of the road. The humble dresser—often functional but visually outdated—is the ultimate canvas for a cost-effective, high-impact DIY transformation.
DIY dresser makeover ideas are the cornerstone of smart home personalization. With basic tools, a weekend, and a touch of vision, you can turn a dated piece of furniture into a custom anchor for your bedroom, living room, or entryway.
This comprehensive guide walks you through the entire process, from finding the perfect piece to mastering painting techniques, hardware swaps, and the aesthetic touches that elevate a simple flip into a piece of custom furniture art.
2. THE FOUNDATION: FINDING AND PREPARING YOUR PIECE
The success of any furniture flip relies on starting with a good foundation and meticulous preparation.
The Search: What to Look For
- Structure: Always check the drawers. Do they slide smoothly? Are the joints sturdy? Avoid pieces with water damage or broken frames. Minor cosmetic flaws are easy to fix; major structural flaws are not worth the effort.
- Material: Solid wood is always preferred (oak, pine, maple) as it takes sanding and paint better and lasts longer than veneer or particle board.
- Style: Look for a classic silhouette. Simple, mid-century modern, or traditional lines are easier to update than overly ornate designs.
The Prep: Cleaning and Sanding
Preparation is 80% of the work. Do not skip these steps!
- Remove Hardware: Take off all handles, knobs, and remove the drawers.
- Clean: Thoroughly wash the entire piece with a degreaser (like TSP substitute) to remove decades of dirt, oil, and furniture polish residue.
- Sand: Lightly sand the entire piece (150-220 grit) to de-gloss the surface. This is essential for the primer and paint to adhere properly. If you are staining, you’ll need to sand down to the raw wood.
DIY transformation: make your home cozier and more beautiful.
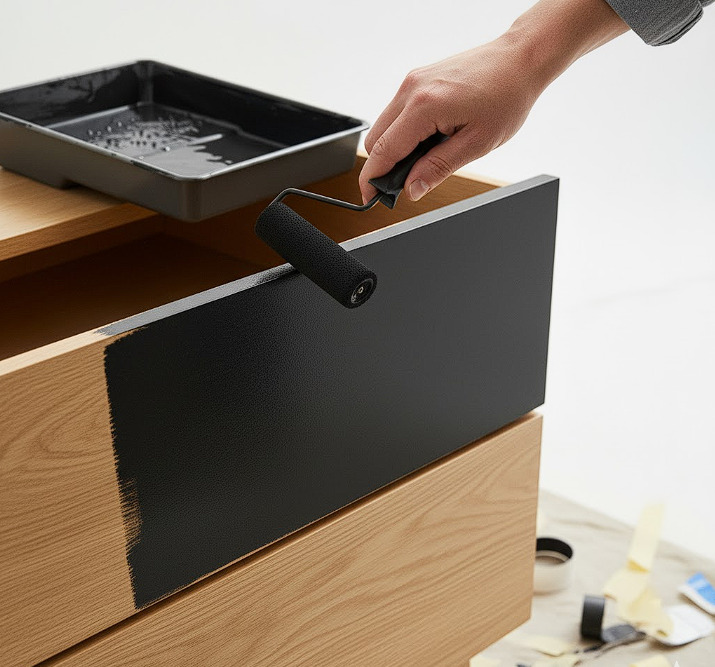
3. PAINTING TECHNIQUES FOR A FLAWLESS FINISH
The right paint choice and application technique can instantly transform a thrift store find into a high-end designer piece.
The Primer is Critical
Use a high-quality bonding primer (oil-based or shellac-based for glossy surfaces) to seal the old finish and block bleed-through from tannins (especially on old wood or pine).
The Paint Formula
- Chalk Paint: Ideal for beginners. It requires minimal prep (often no sanding) and gives a matte, soft, rustic finish. It must be sealed with wax or polycrylic.
- Mineral or Furniture Paint: Offers a more durable, low-VOC (low odor) option with a sleek, self-leveling finish—perfect for modern, minimalist looks.
- Pro Tip: For a flawless look, add a paint conditioner (like Floetrol) to your latex paint and use a high-density foam roller.
The Brushstroke Secret
Apply multiple thin coats instead of one thick coat. Lightly sand between coats (400 grit) to knock down any bumps or brush marks.
4. AESTHETIC UPGRADES: HARDWARE AND ACCENTS
The hardware is the jewelry of the furniture. Swapping out old knobs is the fastest way to modernize a piece.
Hardware Swaps
- Modern Look: Use simple, sleek brass bars, leather pulls, or matte black geometric knobs.
- Farmhouse Look: Use traditional cup pulls or dark, oiled bronze handles.
- The “Filling Holes” Trick: If your new hardware doesn’t match the old drill holes, fill the old holes with wood filler, sand smooth, and drill new holes before painting.
Adding Texture with Trim
To elevate a plain, flat-front dresser, add wood trim molding (like thin lattice strips) to the drawer fronts in a geometric pattern (e.g., Shaker style or a diagonal design) before painting. This creates a custom, architectural look.
Customizing the Top
Instead of painting the top, consider adding:
- Natural Wood Stain: Sand the top down to the natural wood grain and seal it with a warm stain for a two-toned, sophisticated look.
- Marble/Stone Decals: Apply peel-and-stick vinyl that mimics marble or granite for an affordable high-end finish.
Check out this amazing article for a sophisticated look.
5. STYLE SPOTLIGHT: THREE DIY DRESSER MAKEOVER IDEAS
Here are three popular makeovers aligned with the Cozy Crafted aesthetic:
Idea 1: The Modern Minimalist
- Finish: Matte black or deep charcoal gray.
- Hardware: Thin, brass or brushed nickel pulls.
- Details: Keep the surface smooth and paint all one color for a dramatic, simple statement.
Idea 2: The Two-Toned Natural
- Finish: Crisp white paint on the body, with the drawer fronts sanded and stained a warm walnut color.
- Hardware: Simple wood knobs or small leather pulls.
- Details: Focus on the natural wood grain on the drawer fronts for texture.
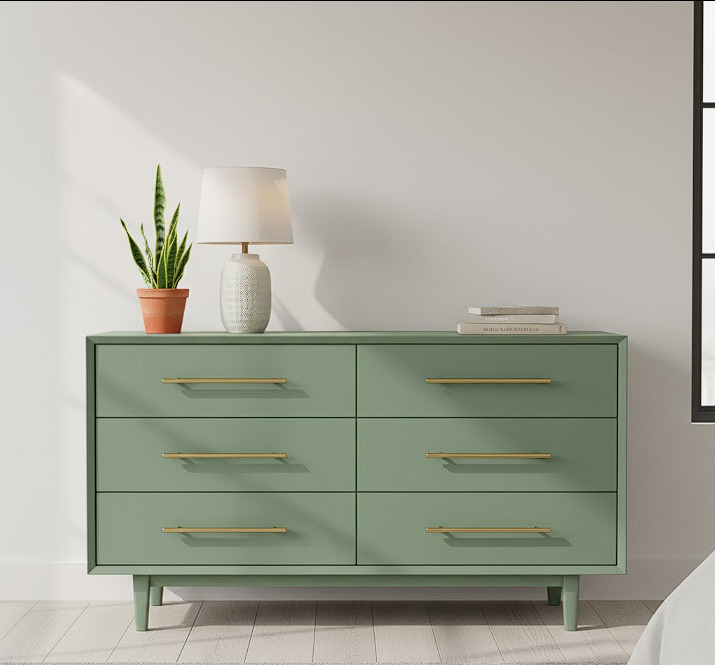
Idea 3: The Textured Boho
- Finish: Soft, muted color like a dusty rose or sage green.
- Hardware: Large, woven rattan or chunky wood knobs.
- Details: Apply peel-and-stick wood grain or woven wallpaper to the drawer fronts for a subtle, natural texture. Check out these amazing wood stickers!
6. CONCLUSION: BUILD YOUR CHARACTER PIECE
Embracing DIY dresser makeover ideas is one of the most rewarding ways to personalize your home. It’s sustainable, budget-friendly, and results in a custom piece with a story to tell. By investing time in proper preparation and thoughtful hardware choices, you can achieve a sophisticated, high-end look that seamlessly integrates into your cozy home aesthetic.
Go ahead, find that forgotten piece of furniture, and unlock its potential!
Which finish will you choose for your next thrift store flip—a bold matte color or a warm, two-toned stain? Share your plan below!